Overview
This document will review the creation of the customer process and serve as a reference when adding new customers, suspects, or prospects. Users will be able to update existing customer data and delete information for customers for which no data has been collected.
Process
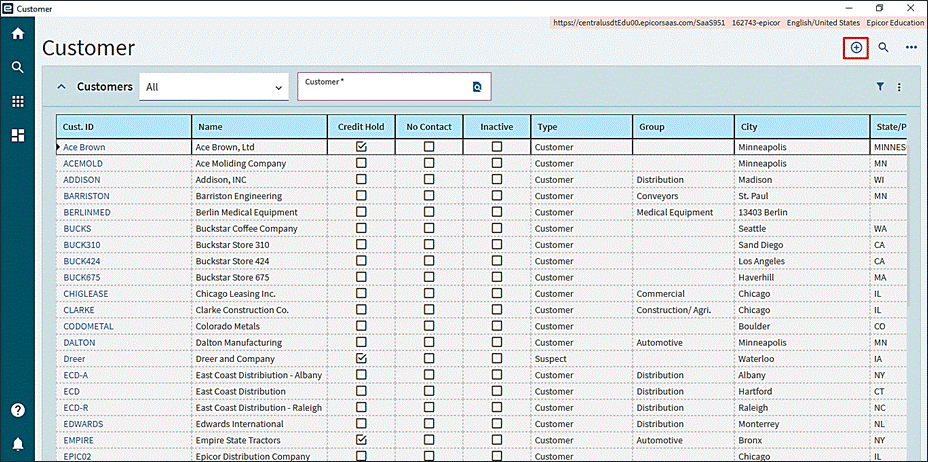
This application creates sales orders, quotes, and accounts receivable invoices. Customers can be classified as prospects, suspects, or customers. These classifications allow users to create customer records for prospective business partners.
Procedures
- Create the customer
- Set credit limit on customer
- Remove customer from credit hold
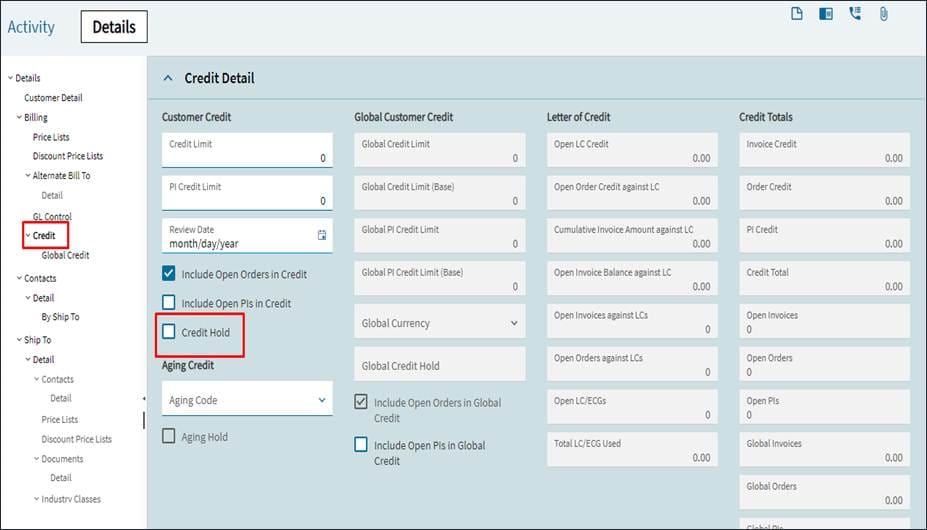
New customers are automatically placed on credit hold. You must clear the Credit Hold checkbox on the Billing > Credit > Credit Detail sheet to display transactions for the customer.
The menu paths and procedures used during the Create and Change process are the same.
Menu Path
Select any of the following menu paths options to view the customer’s data.
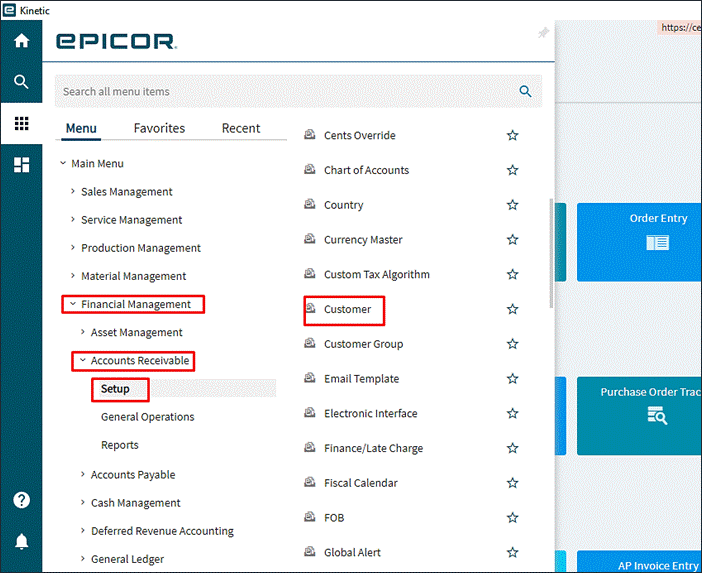
- Financial Management > Accounts Receivable > Setup > Customer
- Production Management > Material Requirements Planning > Setup > Customer
- Sales Management > Order Management > Setup > Customer
- Sales Management > Quote Management > Setup > Customer
Customer Maintenance
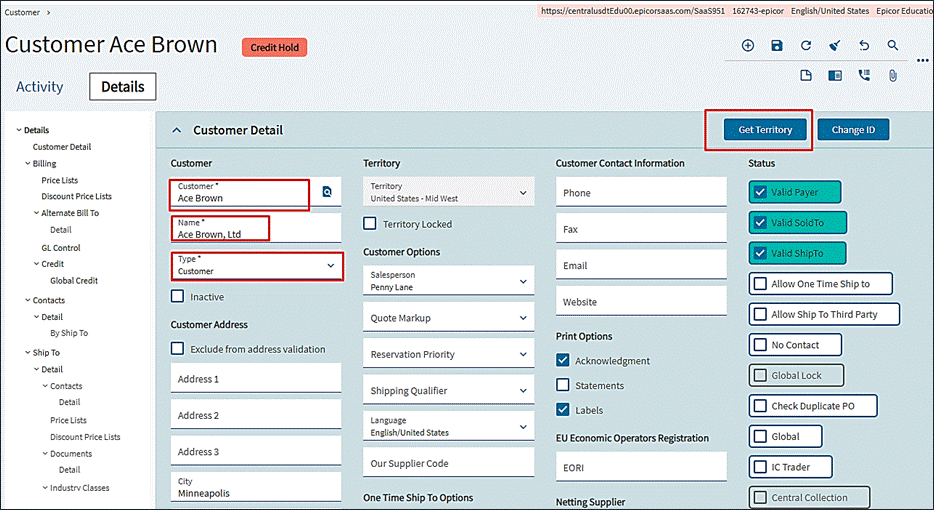
The required fields in the following diagrams are highlighted in red.
| Field Name | R/O/D* | Description |
| Customer | R | Specifies customer record’s unique identifier. Choose a distinct identifier, i.e., customer’s initials or the first few letters of their name. Users can modify the customer ID as needed. |
| Name | R | Enter the customer’s name, which will appear on quotes, sales orders and other sales/shipping documents. |
| Type | R | Select Customer Type: Suspect: No quotes or sales orders exist; however, you may do business with them in the future. Prospect: Quote exists but no sales order. Customer: Sales order exists. Cannot change back to Suspect or Prospect. |
| Address | R | This is the customer’s primary sold-to and bill-to address. Users can choose to enter a different address on the bill sheet. A maximum of three address lines are allowed. |
| City | R | The city where the customer is located. |
| State | R | The customer’s location in Canada or the United States. |
| Postal Code | R | indicates the customer’s zip code. If the postal code is international, use the country’s required punctuation. |
| Country | R | Specifies the country where the customer’s address is located. This also sets the customer’s default language, currency, and address format. |
| Save OTS as: | O | Selecting “Allow One-Time Ship-to” allows you to save the one-time shipment as None, Customer, Prospect, or Ship-to. |
| Salesperson | O | Auto populates both the salesperson and assigned territory for the customer’s account. Users can modify these details. |
| Reservation Priority | O | Indicates orders for this customer will be fulfilled before orders from other customers. |
| Shipping Qualifier | O | Specifies the stage of completion an order needs to meet before it’s shipped to the customer. Options to select from are: Order Complete, Line Complete, and Unused. |
| Language | R | Specifies the default language that will be printed on all Crystal report documents sent to this customer. |
| Phone | R | Customer primary phone number. |
| Fax | O | Customer primary fax number. |
| O | Customer primary email address. | |
| Website | O | Specifies the customer’s URL or web address. |
| Territory | O | Identifies sales region for the customer. To obtain the territory using the zip code, select the “Get Territory” tab. |
| No Contact | O | If checked, the customer will be removed from all marketing and customer lists. |
| Check Dup PO | O | This indicates that each quote or order from this customer must have a separate purchase order number. |
| Global Lock | O | Select If you want the customer record for this company to remain active even after using multiple companies. Another company’s modification will not be possible. |
| IC Trader | O | Indicate if the customer’s transactions can be transferred between companies. This can only be accessed using the “External System Integration” tools. |
| Valid Payer | O | Determines if the customer account is a valid payer authorized to remit cash receipts in AR. |
| Valid Sold-to | O | Determines if the customer account can be entered as sold-to-customer for both order and AR invoice entries. |
| Valid Ship-to | O | Determines, at order entry, if the customer account is eligible to be used as a ship-to customer. |
| Allow One-time Ship-to | O | Indicates whether more than one One-Time Ship-to address can be added to a customer’s sales orders, service contracts, service calls, AR invoices, or shipment. |
| Allow Ship-to Third-Party | O | Indicates if an alternative One-Time Ship-to address can be added to the customer’s account for sales orders, service contracts, service calls, and AR invoices. |
| Print Acknowledgment | O | Select box to print a sales order acknowledgement for each order generated for the customer. |
| Print Labels | O | Select to indicate if customer shipping labels can be printed using a third-party reporting tool. |
| Print Statements | O | Select whether to generate customer AR Statements. |
| Exclude from Address Validation | O | Selecting this box indicates Epicor Tax Connect will not validate customer’s address unless Tax Connect is available. |
| *R/O/D (Required / Optional / Display) | ||
Customer Address Format
Menu Path
Customer > Address Format Tab
The address format sheet lets you customize the appearance of the ship-to, bill-to, and primary customer addresses and will be used on all sales orders, accounts receivable invoices, and other reports that are specific to this address. Users can select which fields in the address section to print and in what format.
Before printing, the system verifies the address format in the ship-to or bill-to location record. If no format is specified, the customer record is reviewed. If an address format matching the customer’s country cannot be found, the default address format is used.
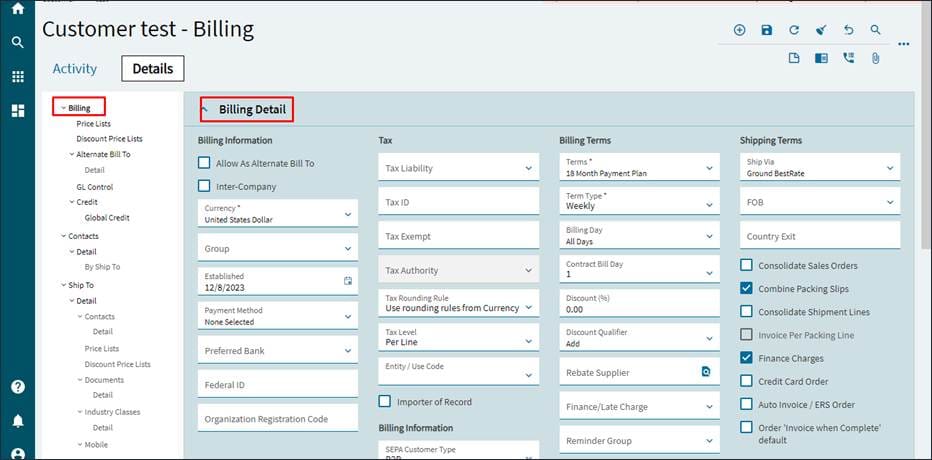
Customer Billing
This section includes the customer’s billing information, which is used on statements and invoices to identify the customer’s accounts receivable account, currency, tax options, billing and shipping terms on all sales orders, AR invoices, and other correspondence.
Menu Path
Billing > Billing Detail Tab
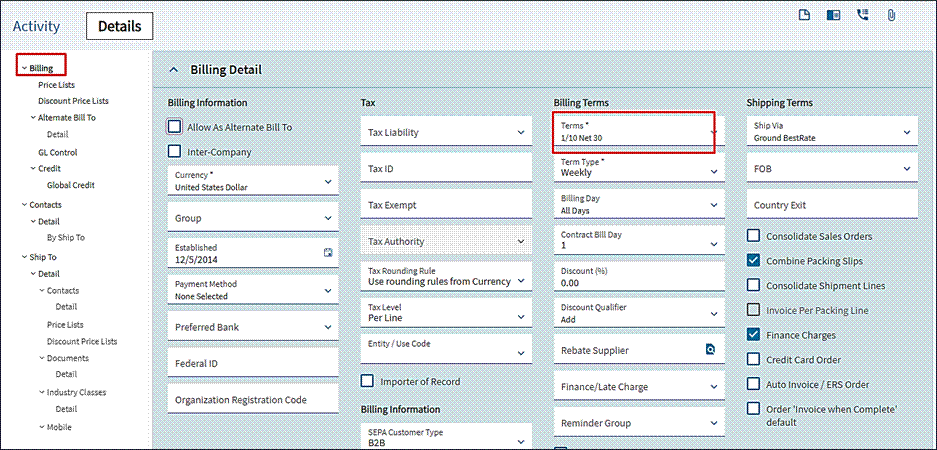
Each customer record requires a terms code; the remaining billing information is optional.
| Field Name | R/O/D | Description |
| Inter-Company | O | Indicates customer’s status as an inter-company customer. |
| Currency | O | Specifies customer’s base currency and currency code. |
| Group | O | Determines customer’s code. The application uses this field to filter or sort reports and also link to price lists. |
| Established | O | The date the customer was first contacted. |
| Payment Method | O | Indicates how orders will be paid for by customers. |
| Preferred Bank | O | Specifies the preferred bank for cash receipts from sales to this customer. |
| Allow as Alternate Bill-to | O | Customer can be specified as an Alternate Bill-To customer for other customers; this is useful when a customer has multiple bill-to addresses. |
| Tax Liability | O | Select the tax liability option for this billing address. |
| Tax ID | O | Customer’s state tax identification number. |
| Tax Exempt | O | Indicates reason the customer is exempt from sales tax. (Used as a default in AR invoice entry.) |
| Tax Authority | O | This is used to connect users to an external financial system. |
| Tax Rounding Rule | O | Defines customer-specific Tax Rounding Rule. Options: Use the currency’s rounding rules.Round to the nearest whole number of decimals in the currency.Round to the nearest whole number of decimals in the currency.Round to the nearest whole number of decimals. |
| Tax Level | O | These are the customer’s payment terms. |
| Terms | R | This is the customer’s payment terms. |
| Term Type | R | The frequency this customer is billed: (W) weekly or (M) monthly |
| Billing Day | O | The day of the week or month that the customer is Billed. (The default setting, “ALL Days,” allows you to bill the customer at the time of shipment.) |
| Contract Bill Day | O | The day of the week or month the customer is billed for service contracts. This works with contracts and field service. |
| Discount % | O | This is the default discount percentage applied to customer orders. |
| Discount Qualifier | O | Used when order value-based discounts apply to customer sale orders. The values MIN and MAX ADD are available. |
| Rebate Supplier | O | Used when using AP Invoices to pay a rebate to the customer via check or another method. |
| Finance/Late Charge | O | If there are any past-due invoices for this customer, the finance/late charge identifier that will be applied. |
| Reminder Group | O | The customer reminder group for sending reminder letters during the dunning process. |
| Deferred Revenue | O | Indicates the customer’s orders and payments will be recorded as deferred revenue; this is applied to both contracts and field service. |
| RA Schedule | O | Determines the Revenue Amortization (RA) schedule for this customer. |
| Ship Via | O | This is the default shipping method used to ship the product to this customer. |
| FOB | O | The point at which you transfer title to the customer for shipped goods. |
| Country Exit | O | The point at which goods enter the country; this data is used in Intrastat reports. |
| Consolidate Sales Order | O | Indicates customer may have multiple orders placed on the same AR invoice. Field is generally not checked. |
| Consolidate Packing Slips | O | This is how invoices are created when a customer receives multiple packing slips at the time of billing. |
| Invoice Per Packing Line | O | Specifies the order to create an invoice for each packing slip line; if three lines are shipped, for instance, the order will generate three invoices. |
| Finance Charges | O | This allows a penalty to be applied to the customer’s past-due balance. |
| Credit Card Order | O | By default, orders placed by the customer must be paid for using a credit card. |
| Auto Invoice / ERS Order | O | At shipment, Evaluated Receipt Settlement and Self Billing (ERS) invoices for demand schedules and sales orders are auto-generated. |
| Order Invoice When Complete Default | O | Indicates orders will not be charged until all line items have shipped. |
Bill-to Address
Menu Path
Billing > Bill-to Tab
Click on “Copy Customer Address” if it is the same as the Bill-To-Address.
Field Name | R/O/D | Description |
| Name | O | Enter the name of the billing contact for this address. |
| Address | O | Enter the customer’s billing address using the three available lines; this information will print on order-related documents. |
| City | O | Enter the city of the customer’s billing address. |
| State | O | Enter the abbreviation for the US State. On the address format tab, you can turn off this field’s printing for international addresses. |
| Postal Code | O | Enter the postal code for the customer’s billing address. |
| Country | O | Select the country code for this billing address. |
| Phone | O | Enter the phone number for this billing location. |
| Fax | O | Enter the fax number for this billing location. |
Credit Detail
Menu Path
Billing > Credit > Credit Detail Tab
Field Name | R/O/D | Description |
| Credit Limit | O | Indicates the total credit amount available to the customer. |
| PI Credit Limit | O | Indicates the maximum credit amount this customer may have for non-traditional payments like postdated checks and bank drafts. |
| Review Date | O | The date when the customer should have their next credit check completed. (For reference only.) |
| Include Open Order | O | This option enables the system to determine the credit total using Open Order amounts in addition to the AR balance. |
| Include Payment Inst. | O | This option calculates the customer’s credit limit using non-traditional payment methods, such as, postdated checks and bank drafts. |
| Credit Hold | O | This option places the customer on Credit Hold, limiting their ability to obtain new credit. (This is the default setting for all new customer). |
Contacts
Navigate to the Customer Contacts tab.
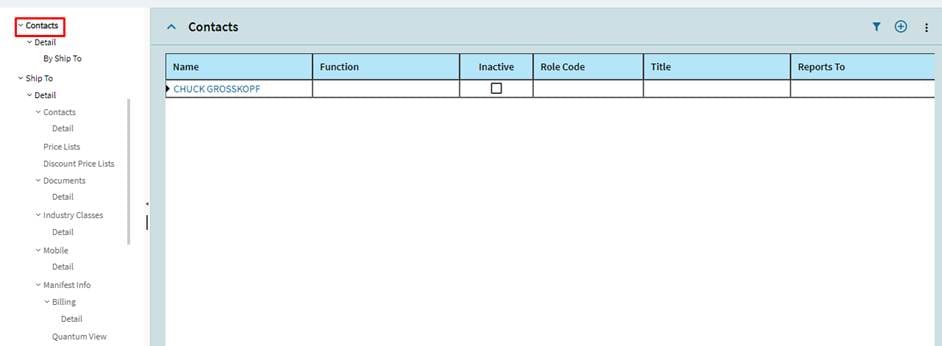
This table’s information is linked to the current contact on the “Contacts-Detail” sheet.
Mailing Address
Menu Path
Contacts > Mailing Address Tab
A contact in charge of receiving quotes may work from a location other than the primary address. Enter the customer’s alternate address on this Mailing Address sheet. When generating quotes for the customer, the quoting contact’s name and address are automatically included. This applies only to customer contacts, not ship-to addresses. To enable the address fields, check the box for ‘Special Mailing Address for Quoting’.
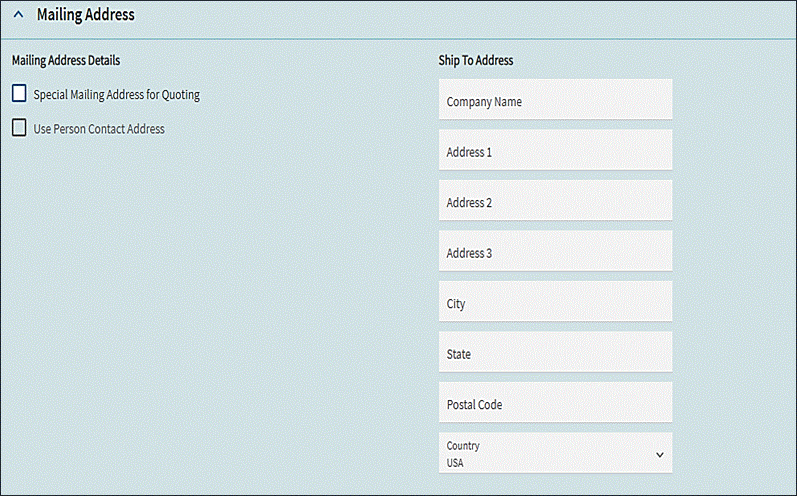
Field Name | R/O/D | Description |
| Company Name | R | The name of the company for the customer. |
| Address | R | Enter the shipping address on the three available lines; this will print on shipping documents and labels. |
| City | R | Enter the City of the quoting address. |
| State | R | Enter the US state abbreviation. |
| Postal Code | R | Enter the Postal Code of the quoting location. |
| Country | R | Indicates the country where the quoting address is located. |
Banks
Navigate to the Banks Tab.
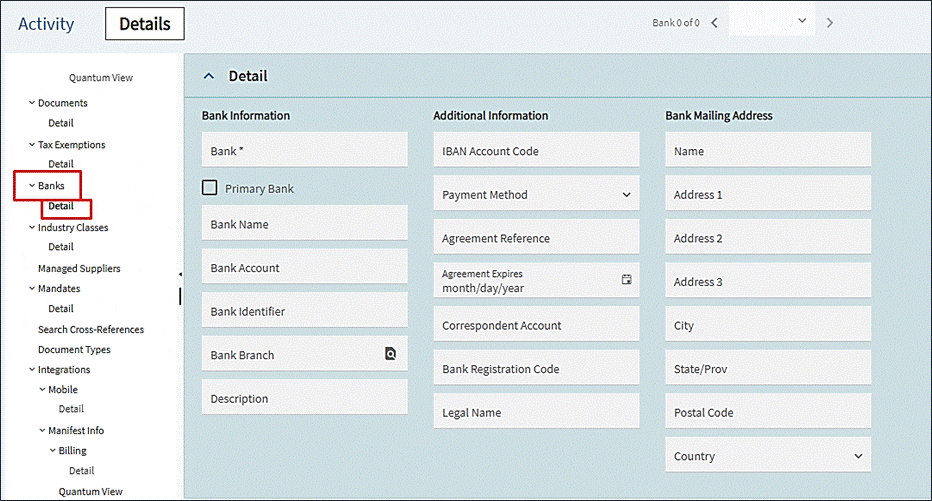
Enter customer’s banking information on the Banks sheet; this is only for reference unless using “Service Connect” to interact directly with the banks. To find a bank branch, use the magnifier.
| Field Name | R/O/D | Description |
| Bank | R | Enter the Bank’s ID or its abbreviation. |
| Bank Name | R | Enter the Bank Name. |
| Bank Account Number | O | Enter the customer’s bank account number. Users can create multiple bank accounts, but each account must belong to a specific bank. |
| Bank identifier | O | This is the Bank’s Identifier typically created by regulatory agencies. Users can enter the identification number given by the American Bankers Association (ABA) to a financial institution in the US. |
| Bank Branch | R | Check to see if the bank or branch description has already been identified. When selecting a bank or branch record, this field will automatically populate. |
| IBAN Code | O | This facilitates payment routing for international customers. |
| Payment Method | O | Search for the Payment Method to see the default method for transferring funds from an account. Users can select from the AR payment options listed under “Payment Method Maintenance.” |
| Agreement Reference | An account agreement allowing the company to debit the customer’s account directly through an electronic interface. | |
| Agreement Expires month/day/year | The Agreement’s Expiration date. | |
| Correspondent Account | O | Identifies the correspondent bank account. |
| Bank Registration Code | O | Identifies the bank identification code. |
| Bank Legal Name | O | Specifies the legal name of the customer’s bank. |
| Name on Bank | O | Provides the full name on the bank account. |
| Address | O | Enter address line 1, 2, or 3. |
| City | O | Enter City for the bank. |
| State, Prov | O | Enter the State or Province. |
| Postal Code | O | Enter the Postal Code. |
| Country | R | Select the country using the drop-down search. |
| Primary Bank | O | Check box to confirm that the bank account is the default for withdrawals. Users can override the default account for specific transactions. If left unchecked, the system will use the first bank created for this customer in alpha order. |