Overview
This document will guide you through the standard SYSPRO Month End (Period End) Activity. Process.
Process
When the company is ready to complete Month End, all users must log out of SYSPRO. During the month-end process, SYSPRO accesses numerous files, tables, and updates logs. If any user logs into SYSPRO to query or post transactions, an internal conflict occurs, which may have an impact on the month-end closing process. As a result, it is highly recommended that all users log out of SYSPRO before beginning the month-end process and remain out until it is completed.
Log Out All Users
You will need Admin Rights in SYSPRO to log out users.
Menu Path:
Utilities > View Users
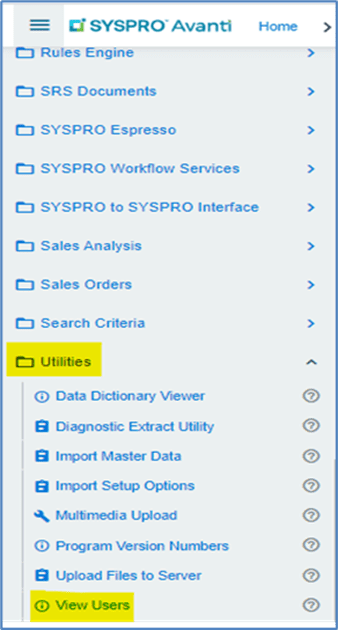
Click on the logout button as highlighted below.
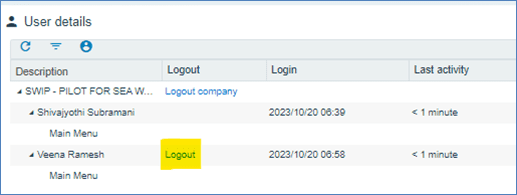
Before logging out a user, confirm they are not in the process of completing a task. You don’t want to accidentally log out someone who’s in the middle of a posting transaction.
Prevent Login
Once all the users are logged out in SYSPRO, it is recommended that you lock the company to prevent users from accessing the program until the month-end processes are completed. Follow menu path below to lock company.
Menu Path:
Administration > General Setup > Setup Options Company

Under Options section, select Prevent login to company, enter reason below the check box.
Click on “save” in in upper right-hand corner to save changes.
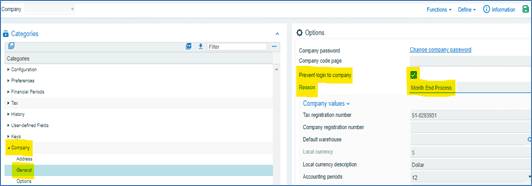
Once completed, users cannot access SYSPRO unless their user profiles grant them overriding privileges. Note: Admin users can log in by ignoring the errors.
Change the Company Date
It is important the company date be changed to the last day of the month for the month end to be processed. For example, if month-end is being processed for October, change the Company Date to 10/31/2023. The date change is only temporary and only valid for the current login session. Once you log out from the SYSPRO, the date again defaults to Current System Date.
Note: If the month-end date is left unchanged, the month-end and reporting will be affected.
To change the date, click on “settings” and then select Personal Settings.
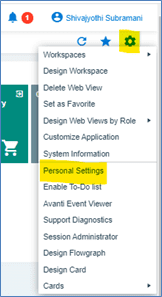
Click on the Calendar date icon. Select the required date. Click on the “save icon” to save the changes.
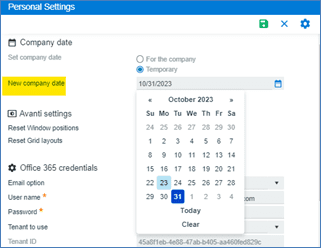
Note: Only Admin Users and users with profile rights can change the Company Date.
Balance Checking – GL Vs. SL
The user processing the month-end must ensure that the Sub Ledger Balances (SL) match the respective Control Account GL balances. If there is a difference between SL Balances and GL Balances, it must be reported to the SYSPRO Support Consultant.
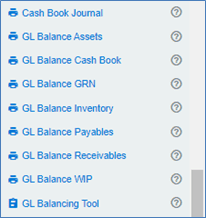
There are SYSPRO-defined standard reports available to determine if there are any differences.
Note: If there are discrepancies between the SL and GL balances, the month-end processing should not be completed until they are corrected. Follow menu path below to access GL Balance report. Follow menu path below to access GL Balance reports.
Menu Path:
General Ledger à GL Integration.

You can find module-specific GL Balance reports by scrolling down as shown below.
Accounts Payable
Click on the GL Balance Payables report.
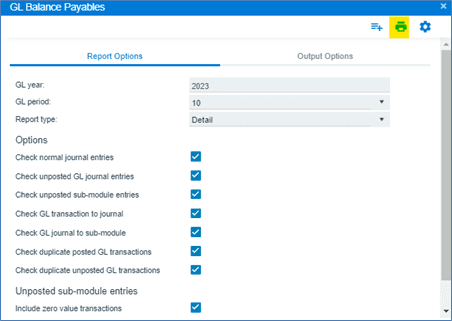
Verify you have selected all of the options for this balancing function, as you want to include everything associated to the Accounts Payable module and the General Ledger.
Click the “print” to icon to process report. The system will process the report and display the details.
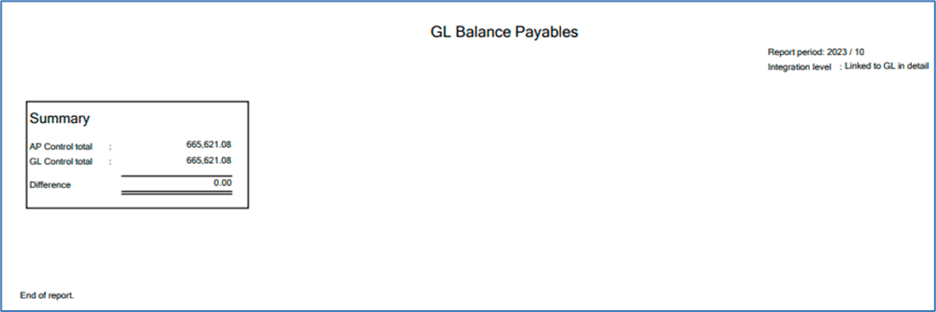
The above results for the GL Balance Payables results show no differences therefore, you may proceed with the month-end for the Balance Payables module and the general ledger.
Accounts Receivable
Click on the GL Balance Receivables report.
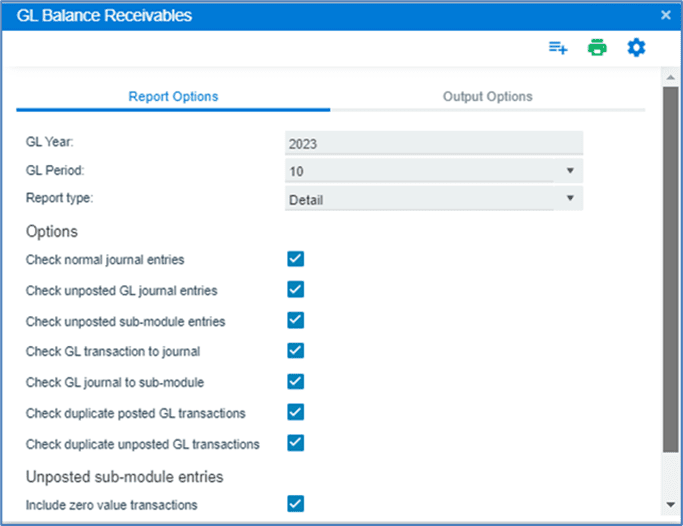
Verify you have selected all of the options for this balancing function, as you want to include everything associated to the Accounts Receivable module and the General Ledger.
Click the “print” to icon to process report. The system will process the report and display the details.

The above results for the GL Cash Balance Cash Book results show no differences therefore, you may proceed with the Month End for the Cash Book Module.
GRN
Click on the GL Balance GRN report.
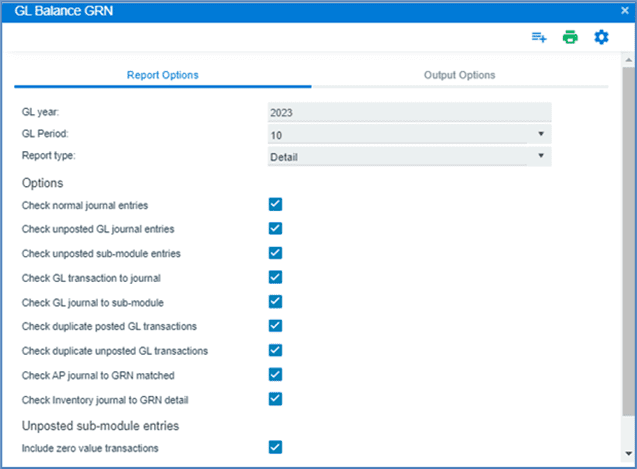
Verify you have selected all of the options for this balancing function, as you want to include everything associated to the GRN module and the General Ledger.
Click the “print” icon to process report. The system will process the report and display the details.

The above results for the GL Balance GRN’s show there are no differences, therefore, you may proceed with the month-end for the GRN’s module.
Inventory
Click on the GL Balance Inventory report.
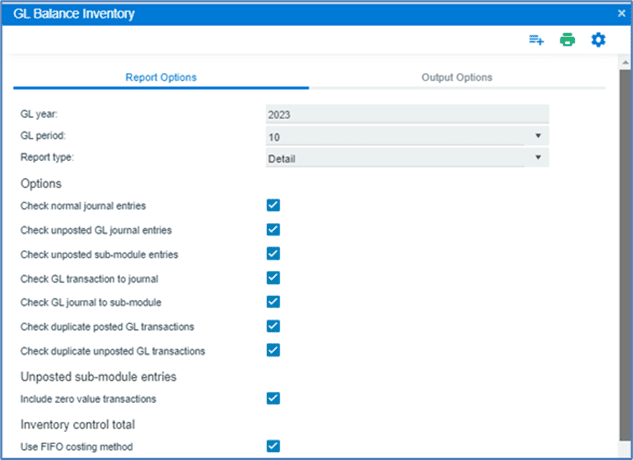
Verify you have selected all of the options for this balancing function, as you want to include everything associated to the Inventory module and the General Ledger.
Click the “print” icon to process report. The system will process the report and display the details.
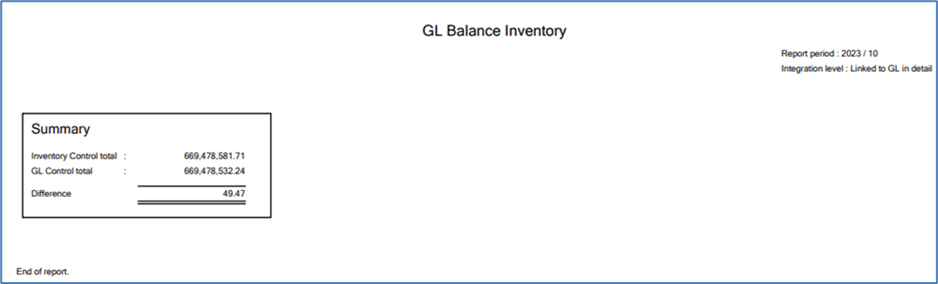
The above GL Balance inventory report shows a $49.47 difference and does not currently show a balance of zero; this discrepancy will need to be reviewed with the SYSPRO team to resolve before proceeding with the module’s month-end processing.
WIP
Click on the GL Balance WIP report.
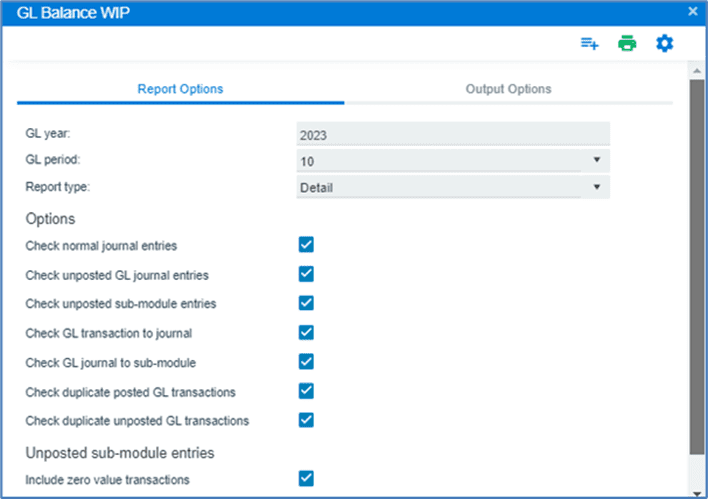
Verify you have selected all of the options for this balancing function, as you want to include everything associated to the WIP module and the General Ledger.
Click the “print” icon to process report. The system will process the report and display the details.
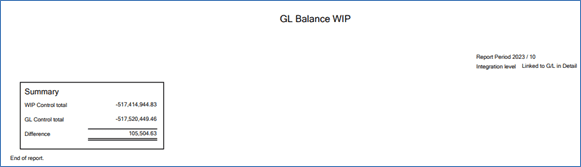
The above GL Balance WIP report shows a $105,504.63 difference and does not currently show a balance of zero; this discrepancy will need to be reviewed with the SYSPRO team to resolve before proceeding with the module’s month-end processing.
Month End Processing
The month-end is processed for each module separately. This process updates period balances and advances you into the next period.
You may process each module’s month-end at different times, but always ensure to set the company date to the end of the month you are processing. If not, you may end up with transactions in the month you are closing that you really wanted to process in the following month.
Prior to processing your month-end, you must run all of the reports your company requires for reconciliation and backup purposes.
Accounts Payable Month End:
Prior to Month-Ending Reporting
The following are recommended procedures/reports for ensuring Accounts Payable module’s integrity. Check to ensure sure all Accounts Payable transactions have been processed. If using Permanent entries, be sure to run the AP Permanent Entries Posting program.
Review the AP at a Glance by Branch query to ensure the total of the General Ledger control accounts matches the closing balance of the Accounts Payable control records.
- Run the AP Trial Balance
- Run the AP Aged Analysis
- Run the AP Expense Distribution
- Run the AP Disbursement Distribution
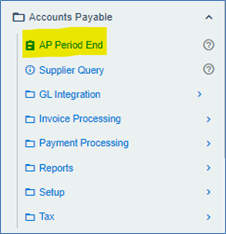
Menu Path:
Accounts Payable > AP Period End
For regular Month End Processing, select Month End only on the AP Period End Screen.
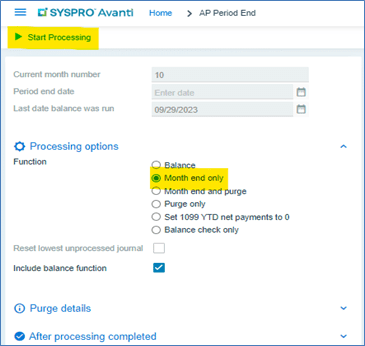
Selecting Month-end only will automatically include the balance function, then Select Start Processing. Once the month-end is processed, the system will display Processing is Completed.
Accounts Receivable Month End:
Prior to Month End Reporting
The following are recommended procedures/reports for ensuring Accounts Receivable module’s integrity. Check to ensure sure all Accounts Receivable transactions have been processed. If using Permanent entries, be sure to run the AR Permanent Entries Posting program.
- Run the AR Invoice Register
- Run the AR Cash Journal
- Run the AR Sales Distribution
- Run the AR Payments GL Distribution
- Print your AR Balance Report.
- Print the AR Trial Balance
- Statement Print (If sending statement to customer)
- Credit Management
Verify the total Accounts Receivable amount matches the sum of the Accounts Receivable control accounts in the General Ledger. Follow below menu path to process month-end.
Menu Path:
Accounts Receivable > AR Period End

For regular Month End Processing, select Month end only on the AR Period End Screen.

Selecting Month end only will automatically include the balance function. Select Start Processing. Once the month-end is processed, the system will display Processing is Completed.
Cash Book Month End:
Prior to month-end reporting
The following are recommended procedures/reports that should be completed to ensure the integrity of the Cash Book module. Check to ensure sure all transactions have been processed for inventory. If using Permanent entries, be sure to run the AR Permanent Entries Posting program.
- You may print the Cash Book Journal Report optionally.
- Print the Cash Book GL Distribution Report.
- Print the Cash Book Balance report by using the Balance function of the Cash Book Period End program.
- Reports that you might want to print as well before processing the Period End:
- Reconciliation Statement Report
- Cash Book Print Report
- Consolidated Statement Report
- Cash Book Tax Report
- Currency Variance Report – Print this if you are using foreign currencies.
Menu Path:
Cash Book > Cash Book Period End
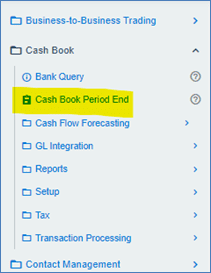
For regular month-end processing, select Month End Only on the Cash Book Period End Screen.

Select Month end only, then select Start Processing. Once the month’s end has been processed, the system will display the message Processing Completed.
Inventory Month End:
Prior to month-end reporting
Below are the recommended procedures/reports that should be completed to ensure the integrity of the Inventory module. Check to ensure sure all transactions have been processed for inventory. If using Permanent entries, be sure to run the AR Permanent Entries Posting program.
Reports that you might want to print before processing the Period End for audit purposes:
- Inventory Journal report
- WIP Labor Journal report
- GRN Journal report
- Inventory Distribution report
- GRN Distribution report
- WIP Labor Distribution report
Using the balance function, print the Inventory balance report at the end of the inventory period. Run the Inventory Valuation Report, including all stock codes. Validate that the total inventory amount matches the sum of the inventory control accounts in the general ledger.
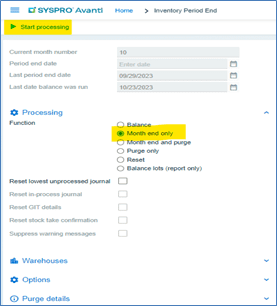
Menu Path:
Inventory > Inventory Period End
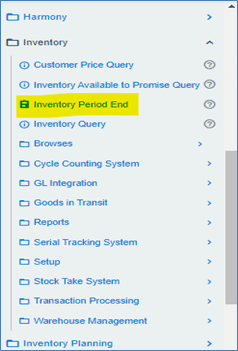
For regular month-end processing, select Month end only on the GL Period End Screen as highlighted below, then select Start processing.
Once the month’s end has been processed, the system will display the message Processing Completed.
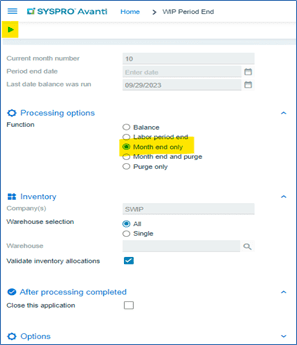
Work in Progress Month End:
Menu Path:
WIP > WIP Period End
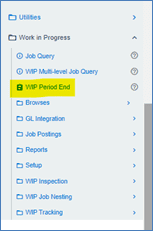
To perform standard month-end processing, select Month end only on the WIP Period End Screen as highlighted below, then select Start processing.
Once the month’s end has been processed, the system will display the message Processing Completed.
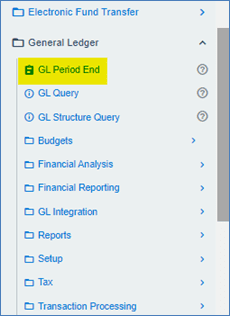
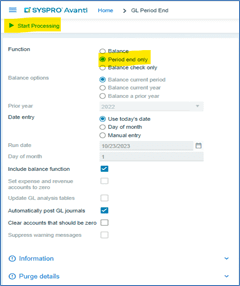
General Ledger Month End:
Prior to month end reporting
Below are the recommended procedures/reports that should be done to ensure the integrity of the General Ledger module.
- Ensure all transactions have been processed for all the sub modules.
- Ensure month-end processing has been completed for all the other modules used within your SYSPRO environment.
- All manual journal entries have been completed and posted within the general ledger Module.
- Run and print the GL Journal Report
Menu Path:
General Ledger > GL Period End
For regular month-end processing, select Period end only on the GL Period End Screen as highlighted below, then select Start processing.
Once the month’s end has been processed, the system will display the message Processing Completed.
Conclusion
All modules, with the exception of the General Ledger, are typically closed on the last day of the month or the first day of the following month. As an administrator, you have restricted user access and changed the company date allowing you to close out either a specific module or all modules. You must now release the system so that other users can resume transaction processing.
Return to the Prevent Login section and adjust the settings to enable users to log back into the system.